Showing posts with label Cooking. Show all posts

Tuesday, February 23, 2016

Making Gnocchi

This is my third attempt at gnocchi making.  First time was at a supper club with friends.  We used a traditional recipe and I think it turned out pretty well.  It was a challenge to cook for a crowd, to keep the gnocchi from sticking together and becoming mushy.  We still ate them with gusto though.   
As with most things in the kitchen, practice is required to get the hang of it and feel comfortable with the technique.  I've been practicing and it's getting easier.  I still wouldn't say I've mastered it.  I found a recipe that calls for ricotta cheese, instead of the cooked potato and because I had some cheese that I needed to use I thought I'd give it a try.  I found it to be a lot easier than the potato recipe.  Here's how it came together:
I mixed the ricotta cheese, egg, olive oil and salt and pepper in a bowl.  Then I added plain flour, a half a cup at a time, until the dough was soft and held together.  I placed it on a floured mat and kneaded it a few times, then cut it into six pieces.
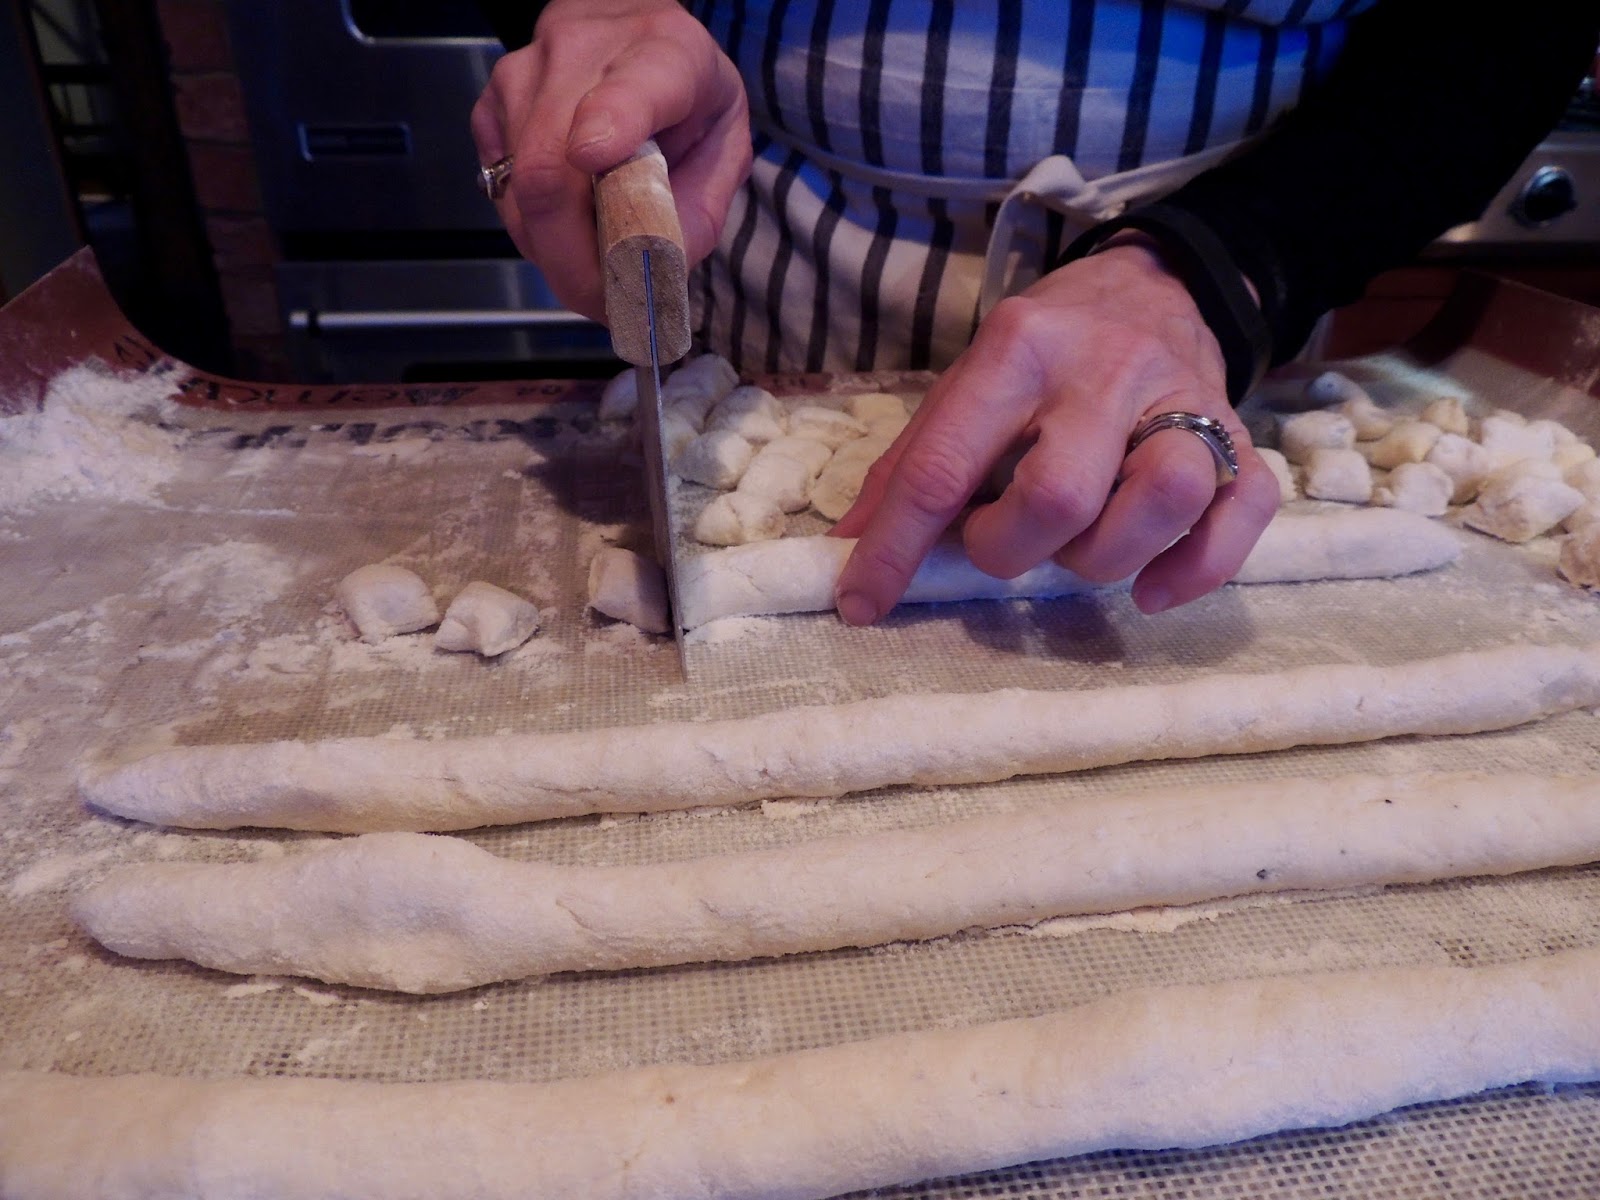
I rolled each piece into a long rope,
and then cut them into small pieces.  
I rolled each little piece of dough over and down the back of a fork.
The ridges are for collecting the wonderful sauce that you serve with the pasta.
Bring a pot of salted water to a boil and drop the gnocchi in.  When they float, they are ready.  It only takes a minute or so.  Drain and serve with your favorite pasta sauce.  At the moment, mine just happens to be Giada De Laurentiis' marinara.  I'll blog that one soon.
I like these little pasta pillows!  I've learned that they need to be eaten as soon as they come out of the pot, which means sauce and anything else you want to have with them must be ready and waiting.  This recipe makes more than we can eat, so I've put some in the freezer (uncooked) and the next time I plan to try a copycat version of Olive Garden's Chicken and Gnocchi soup.  Yum!

The recipe can be found here.

*Take the Time Goals - #17 Eat less meat.  #20 Make pasta once a month.

Wednesday, January 14, 2015

Make Your Own Mayo

Making your own mayonnaise may not be something that's ever crossed your mind.  I've always heard  it was better than what you could buy in the store, but so are homemade cookies, and quite frankly that has been a bigger draw to me than making my own mayonnaise.  But, I'm on an eating plan right now that doesn't allow cookies (darn it), but does allow mayonnaise, if you make it yourself from healthy ingredients.  I am a fan of that white creamy stuff and plenty of dishes that contain it in the ingredients list.  I'm thinking of potato salad, egg salad, tuna salad, chicken salad, and so on.  Those are all things that are usually banned from most diets.  And you mean I can have that and still lose weight?  Okay, I'm interested. 

The recipe I used came from this cookbook.  Actually, it's full of great recipes, and I may share some of those later on.  But for now, let me show you how easy it is to make your own mayonnaise from a few basic ingredients.  

Before I do that though, I pulled a jar of store bought mayo out of the fridge and looked at the ingredients list.  This is what I saw on the Kraft Light Mayo jar : water, soybean oil, modified food starch, vinegar, sugar, maltodextrin, salt, natural flavor (hmmm, wonder what that is?), eggs, mustard flour, lactic acid, potassium sorbate, phosphoric acid, dried onions, dried garlic, calcium disodium EDTA (I have no idea), beta carotene.  Even though I don't know what all those things are, I do know that they are listed in order by the amount of each ingredient in the finished product.  So, my store bought mayonnaise is mostly water.

My home made mayo has an egg, lemon juice, light olive oil, dry mustard and salt.  This small ingredients list is what gives it the thumbs up for my eating plan.  Healthy fats and a little seasoning.  That's it.  This can be made in a food processor or blender.  I used my blender, and it turned out beautifully... the second time.  Yeah, the first time didn't work so well, because I didn't fully follow the directions.  Making mayo, is like a science experiment. There's all kinds of science going on in that blender.  Things like emulsion and creating colloids was mentioned in the recipe.  Don't worry. You don't have to really understand it, but you do  have to follow the directions perfectly.  And here's the way it works.

Place the egg and 2 T. lemon juice in the food processor or blender.  The recipe called for bottled lemon juice, because of it's reliable acid content, but I didn't have any, so I used fresh lemon juice and it still worked beautifully.  Put the lid on the blender and forget about it for awhile.  (This is where I messed up. I was too anxious, or impatient.  Same thing I guess.)  Leave it for at least 30 minutes or up to a couple of hours.  
Add 1/4 cup of the olive oil,  1/2 t. dry mustard,
and 1/2 t. salt to the egg and lemon juice.   Blend until combined.
While the blender is running ( I put mine on a slow setting), very slowly, in a small stream, pour in the remaining cup of olive oil.  Patience is important here too, because it should take a couple of minutes to pour all of that oil in the blender.  Pretty soon, the blender will begin to make a new sound, one that means that your liquids have emsulified (I love sounding all scientific), and voila, you have mayonnaise. 
Condiments may not make the most beautiful food photography, but I think this is some lovely mayonnaise!  And it tastes amazing. Really, it is so much better than the stuff from the store.
This doesn't really feel like dieting to me.  
Now that I've mastered mayonnaise, I may have to try the recipe for BBQ sauce, hoison sauce, and ketchup, all yummy things that normally have a ton of sugar in them.  For now though, I'm sold on this mayo, and I think I will have to continue making it, even when the diet is over.   It's worth the effort.

I'll let you in on another thing I've discovered recently.  Coconut milk is a magic ingredient.  Whipped sweet potatoes with coconut milk and a few raisins is totally divine.  Replacing the cream that I would usually use in my butternut squash soup with coconut milk was a good idea too.  Perfectly legal on my diet.  I just love happy food discoveries. 

Thursday, December 11, 2014

Better Than Take Out

Ready for a tasty Chinese style dinner, without having to call for take out?  This is it.  I stumbled upon this recipe a few years ago and it has become one of our favorites.  It comes together quickly, especially if you have some rice tucked in the freezer.   We like brown rice, but the longer cooking time can sometimes be a problem, if you're in a hurry to get dinner on the table.   I've found that it freezes beautifully, so whenever I cook rice, I always make extra to put in the freezer.  A side dish of steamed broccoli is a must for me.  I love how it pairs with the sweetness of the chicken.

Start with boneless chicken breast.  I use one whole breast and pound it to equal thickness.  This serves two generously, but you would want to use more chicken for a larger family.  Cut the chicken into bite size pieces.
Drop the chicken pieces into a bowl with corn starch.
Carefully toss the chicken until the pieces are completely covered.
Heat a skillet with olive oil and add the chicken pieces to the pan.
Cook until chicken is lightly browned on all sides.
While the chicken is browning, mix up a simple sauce of pineapple juice, honey, soy sauce and fresh ginger.
I peel my ginger root with a vegetable peeler,
and grate it with my microplane zester.  This is one of the best kitchen tools I own.  It's perfect for zesting fruit, grating nutmeg, hard cheeses and for ginger.  I LOVE my microplane zester.
I use less ginger than the recipe calls for, because ginger can be intense.  Don't be tempted to leave it out though, as it is an essential part of the recipe.  I guess you could use powdered ginger, in a pinch,  but it will be better if you use fresh.  Leftover ginger can be peeled and stored in the freezer for the next time you need it.  

Cut up a couple of green onions and have some sesame seeds handy.
Once the chicken is browned, pour the sauce into the pan.  The corn starch will cause the sauce to become nice and thick.  Within a couple of minutes it will be ready.  Add the green onions and sesame seeds.  The recipe calls for toasting your sesame seeds, but I omit this step and it's still delicious.  
Enjoy.  It really is better than take out.
Sesame Chicken
2 lb. boneless chicken breast
2 T. cornstarch
1 T. olive oil
1/2 cup pineapple juice
1/4 cup honey 
3 T. soy sauce
1 T. grated fresh ginger
2 green onions, chopped
cooked rice

Cut chicken into pieces.  Combine chicken and cornstarch.  Toss
to coat.  Heat oil in skillet.  Cook chicken until browned and cooked 
through.  Reduce heat and stir in pineapple juice and next 3 ingredients.
Bring to boil and cook until thickened.  Remove from heat and sprinkle
green onion and sesame seeds.  Serve over rice.


* If using more chicken, double the ingredients for the sauce.  You want enough
to generously cover the chicken and a little extra for spooning over the rice.

Saturday, June 14, 2014

Ten Lessons I've Learned From My Dad


Our parents are our first and greatest teachers.  Even when they don't realize it, we are learning from them.  Example is everything.  And often, it's the little things that mean the most. Growing up and leaving home isn't the end of the education either.  Here's a few lessons I've learned and am still learning from my dad. 

1- Choose your love and love your choice. My mom and dad married young and when I came along he was only 20 years old.  Like all marriages, they had their struggles, but he stuck by her side, including years as her caregiver after she had her debilitating stroke, until she took her last breath.  I know it wasn't easy, but that says a lot about how he feels about the institution of marriage.  I appreciate that example.

He has chosen twice, and he has chosen well.
2- Families are important and we support each other.  I grew up knowing that I was loved and supported by my parents and my grandparents.  Holidays and vacations were a time to be with family.  We spent many hours on Nana's farm and at Grandma's house.  We went to the beach every year for vacation.  My dad sat through countless dance and baton recitals, served as the president of the band boosters, was at every half time performance and parade I marched in.  Lesson learned.  Families support each other.

3- On Sundays, we go to church.  We were a church going family. I'm so grateful that I learned at an early age about Jesus Christ. To this day, it warms my heart to hear my daddy pray out loud.
4-The world is an amazing place.  Go explore it.  Whether he's on a plane or in a car, my dad likes to go!  He's been in many places in the world, and all over the US and Canada.  It's nothing for him to load up his car and take a month long road trip.   I'm happy to say I've inherited that same travel bug.   
5- Work hard.  My dad has always been a hard worker, and in the early years, held down two jobs to support his family.  Retirement didn't slow him down much.  Passing along a good work ethic is one of the most important things a parent can give a child.  I don't remember any specific lessons in the home on how to be a responsible person and work hard.  I know we had chores at home to do, and my sisters and I still laugh about our dishwashing rotation.  Maybe we just picked this up by osmosis, because all his children are hard workers. 

6- The best foods are homemade.  I get my love for food honestly.  As with most southerners, food is a big part of our culture.  Even though my mom was a fantastic cook, my dad's pretty good in the kitchen himself.  And he owns the grill.  This is his famous bbq sauce recipe that we all love, written by his hand.

7. Serve others.  Without attention or recognition, I've watched him serve my mom, his mom and two mother in laws with tenderness and patience.  Trips to the nursing homes and hospitals, were a part of his daily schedule for a season.  He takes care of neighbors yards, plans and orchestrates senior activities and works the clothes closet at his church.  Possessing a servant's heart, he would do anything to help you out.  "When you are in the service of your fellow being, you are in the service of your God."   I think he has this one figured out. 
8- Teach your kids to dance.   My first dance lessons happened while I stood on my daddy's feet.  He has a special dance step that I've never seen anyone else do and he's taught it to all his daughters.  We don't get the opportunity to dance with him very often now, but when we do, we all still know the "dad" slow dance step.  It's pretty special.
9- Get your hands dirty and play in the dirt.  This isn't something I learned as a child, but as an adult I've taken up gardening and am learning lots from my dad.  He has a serious green thumb.  
10- Always have a camera close at hand.  Dad is always taking pictures.  Always.  He's had his bird photos published in a national magazine, and just this week won several prizes in a photo contest. I enjoy sitting down with him and going through old pictures, and new ones too!  Celebrate the good times and capture those memories with photos.  I'm learning this one well.  Just like him, I will stop on the interstate and take flower pictures,
seek out God's beautiful creations and try to get just the right shot,
and most importantly run to the beach in order to catch the sunrise. This one is important.  Don't sleep in and miss the sunrise.  There will never be another one quite like the one you see today.
Happy Father's Day, Daddy.
I love you!

Thursday, May 29, 2014

Strawberry Crepes

We've been celebrating strawberry season in a big way.  The berries have been tasty and plentiful.  My own strawberry bed is producing for the first time and I love picking them warm from the sun and popping them straight into my mouth.  No chemicals on these babies, so I can do that with good conscience.  There are not however, enough to make all the wonderful things that I want to make, so I've been supplementing them with berries from the local farms and some from down the mountain in SC.  They're all delicious!   

A dear friend of mine is getting married in August and I've been asked to help with the food at the reception by coming up with a strawberry crepe recipe.  This has been a tasty project that my family has enjoyed!  Unlike his wife, my husband doesn't usually get too excited about food.  But these crepes, well, they have turned his head.  They might be his new favorite dessert!

This recipe is made in three different steps.  First I made a simple strawberry sauce.
 Strawberry Sauce
1 quart of sliced strawberries
1/2 cup sugar
1/4 cup water
2 T. cornstarch
squirt of fresh lemon juice
I brought the sauce to a boil and then I took a potato masher and squished the berries, leaving plenty of them in larger pieces.  As soon as the sauce began to thicken slightly,  I turned it off and let it cool.  I didn't want to overcook, because I was going for a nice fresh sauce here, not jam.   
The second step was mixing up the crepe batter.  I don't think I've made crepes since high school French class, but if I had known how easy they are,  I would have tried them much sooner.  I dumped all the ingredients into the blender and mixed everything up in a few seconds.
Crepe Batter
2 eggs
1 1/4 cup milk
1 cup plain flour
4 T. powdered sugar
2 T. melted butter
I sprayed a nonstick skillet with coconut oil and poured about 1/4 cup of batter in the pan.  Quickly I turned the pan from side to side to completely cover the bottom. 
As soon as the batter is set, gently flip over the crepe and cook for about a minute.  This all goes really quickly, so have a cooling rack close by so you can remove one crepe and start the next one.  The recipe makes about ten crepes, depending on the size of your pan.  You want them to be lightly browned, like this.
Putting the crepes together was the fun part.  I took one of the cooled crepes and spread it out on a plate.  
Next came the creme filling.  Oh, I forgot to tell you about the creme filling.  I guess this would be step three.   This filling is a divine mixture of cream cheese, powdered sugar, heavy cream and vanilla.   Mix this all together in your mixer and have it ready to spread on the crepes.  This will keep for days in the refrigerator, if you want to make it ahead of time. 
Creme Filling
2 packages of cream cheese, softened to room temperature
1 cup of powdered sugar
1 cup of heavy whipping cream (unwhipped)
1 t. vanilla
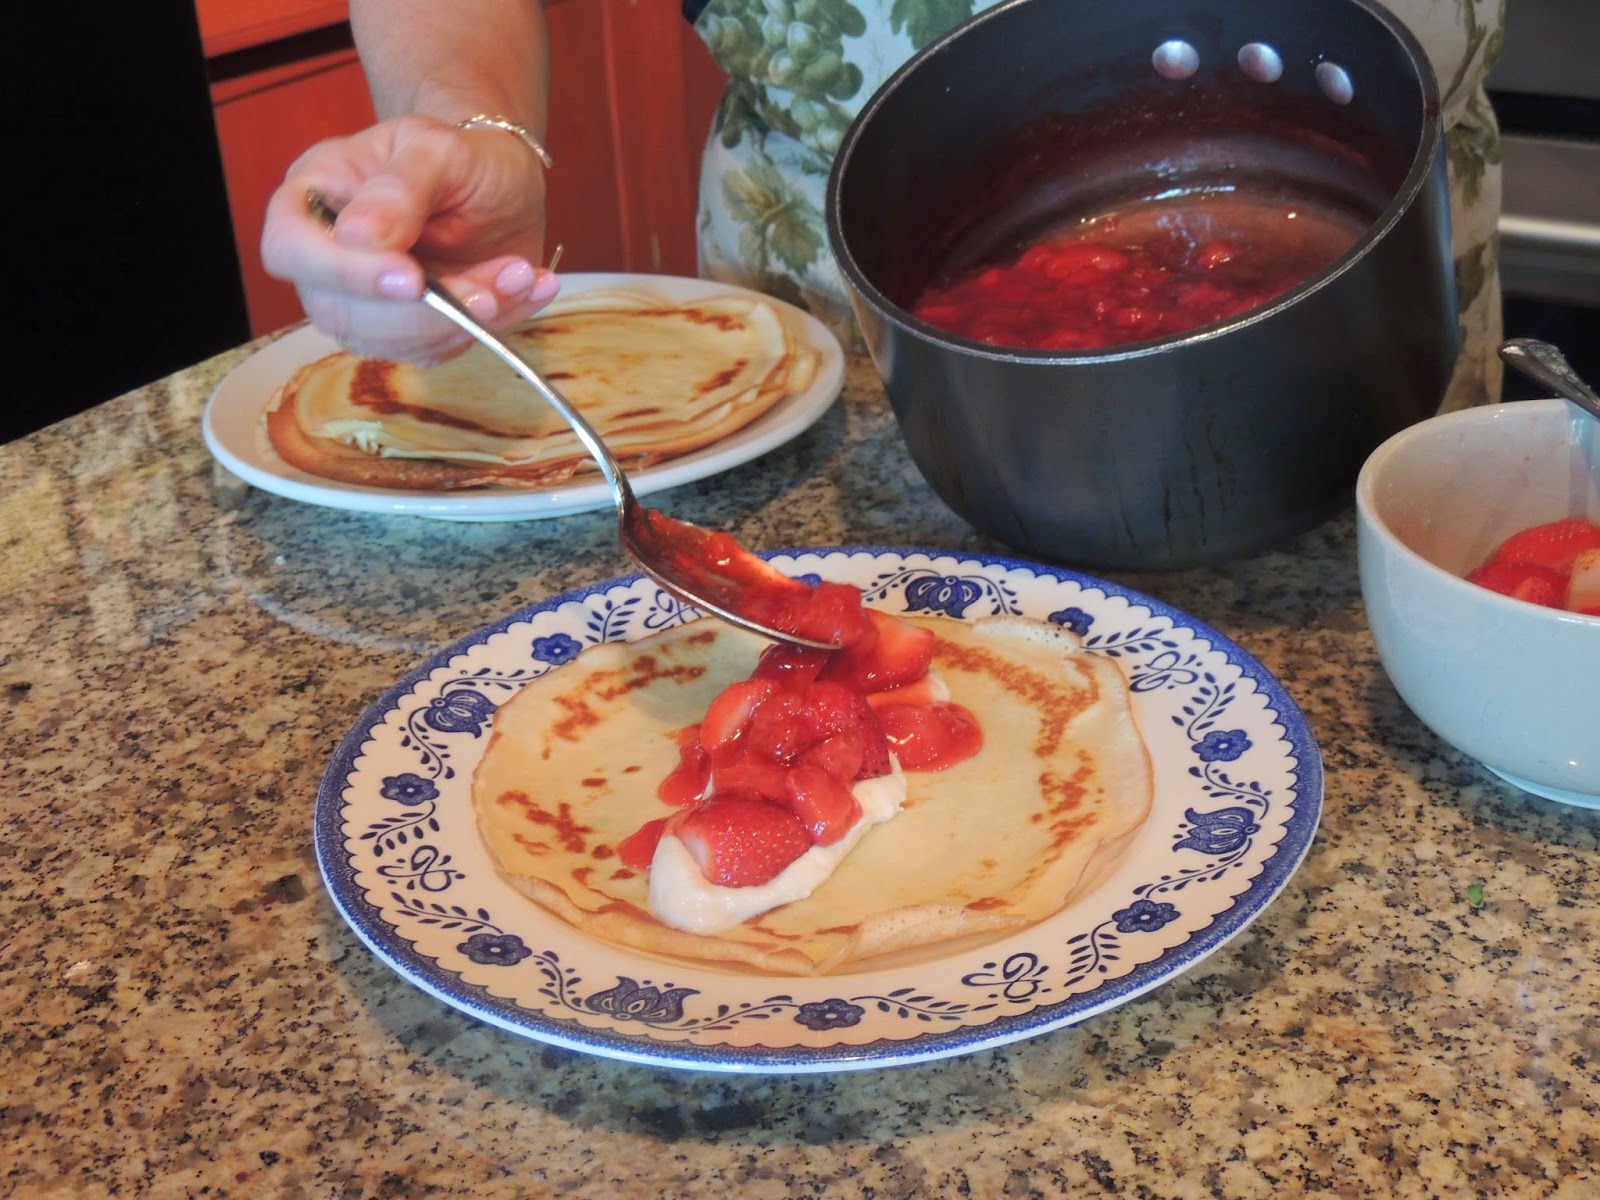
Spread the crepe with the delicious cream filling and then place a few fresh strawberries on top of the cream.
Spoon the strawberry sauce over the fresh berries.
Wrap the crepe tightly with the seam on the bottom.
Make the second crepe, because you will definitely want two.
Sprinkle the tops with powdered sugar.  You could put more fresh berries and whipped cream on the top, but it's really not necessary.  They are perfect just like this.
I think these will be a hit at the wedding!

*Recipe adapted from this website.