Thursday, August 29, 2013

Toaster Strudels

I really have been doing other things besides baking lately- things like hosting a book club meeting and taking a new photography class top the list, and I'm going to post about those soon, but I am on a roll with this cookbook project, so I thought I'd go ahead and share the next recipe.  Mastering that wonderful pastry crust recipe, opened up new possibilities for other delicious goodies. I was anxious to try those home made PopTarts on the cover of Alana's book.
First of all, my husband said I should not, even, call them Pop Tarts because they weren't anything like the cardboard tasting pastry treats that come from the store.  My neighbor stopped by the day I made them and I gave her one to take home and try.  She sent me a note saying the "strudel" was wonderful.  So, toaster strudels they are.

Here's how I made them.  After pulling the perfect pastry dough out of the refrigerator and letting it sit on the counter for about 10 minutes, I rolled it into a rectangular shape, cutting around each side to eliminate the rough edges.  Of course you could use refrigerated pastry dough purchased from the store if you didn't want to make your own.  But that perfect pastry dough recipe is easy and delicious!
I cut the large rectangle into 6 smaller ones.  I carefully lifted one of the rectangles onto the baking sheet and brushed it with an egg wash.
Then I put a tablespoon of jam down the center of the dough.  I used blackberry, strawberry and raspberry and we liked them all, but my personal favorite was the raspberry.  
Another pastry rectangle went on top and then I used a fork to gently press the edges together.
I pricked the top of each pastry with a fork.  My daughter suggested it would have been a good idea to use different designs on each flavor, so you could tell the flavors apart once they were baked.  That would have been clever, but the suggestion came too late.  As it was, we were just pleasantly surprised when we bit into each one.
I brushed the tops of the pastry with the egg wash,
and lined them up on the baking sheet.  The recipe yielded 6 strudels, but I couldn't see going to this much work for 6 strudels!   I doubled the recipe so I would have 12, and actually ended up with 14.  The extras were no problem!
I loved the way they puffed up as they baked.  I sprinkled powder sugar on half of them.  Aren't they pretty?  I knew my hubby would like them this way, as he's not much on frosting, but big on pastry!

Kenzie suggested frosting on the rest, with sprinkles.  I nixed the sprinkles idea, but the frosting was a nice addition!  I like frosting.
Recipe number two was a success.  What will I try next?  I think it will be the cheese crackers.  I'll let you know how they turn out.  Anyone else out there trying some new recipes?

Friday, August 23, 2013

The Perfect Pie Crust

Last week, I introduced my cookbook project , along with a review of the first book I had chosen.  I'd  randomly pulled one of my cookbooks off the shelf, read it from cover to cover, and selected some interesting recipes to try.  You can go here to read my review on The Homemade Pantry by Alana Chernila.
I love this book and could hardly wait to squeeze some kitchen time in my schedule, so I could begin experimenting.  First on my list was pie crust.  Me and pastry dough, well we've not always been on the best of terms.  I can make a pie crust from scratch, but it's a struggle.  Sometimes its too crumbly and is a complete mess when I try to roll it out to put in a dish.  To counteract this problem, I often end up adding too much liquid, which results in a goopy mess.  Sometimes it turns out tough and  of course what I'm going for, is tender and flaky.  After fighting with the dough and finally getting it in the dish, it doesn't always look beautiful.  As you can see, making a pie with a homemade crust is a bit of a risk for me.  "Will it work this time?", is the question that I ask whenever I start to make a pie, and because of this uncertainty, pie making has never been my favorite thing to do.  Which is a shame, because it's unquestionably my husband's favorite dessert.

Now, I could always buy a crust in the store and I do from time to time.  But the only way I can do that, is if I don't look at the list of  ingredients.  Ignorance is bliss doesn't really apply when you've already been educated, but I can selectively forget what I've learned in a pinch.  Pie crust should really only have a few basic ingredients and it's always best when you can pronounce them.   After reading Alana's recipe for basic pie crust, I was intrigued by her method, which she has convinced me is fail proof, and is totally unlike any pastry recipe I've used in the past.  The key is keeping all the ingredients cold and using a stand mixer.

So, here we go.  The first thing I did was take my butter directly from the refrigerator and dice it in small pieces.
After measuring the flour into my bowl, I dropped the butter cubes into the flour and gently mixed them up by hand, covering all the butter with flour.  
In a measuring cup, I added apple cider vinegar and salt to water.  Then the bowl with flour and butter and the measuring cup with the liquids went into the freezer for 10 minutes.  The only hard part here?  Cleaning out enough space in the freezer to sit a large mixing bowl!
After the ten minutes had passed, I attached my paddle to the mixer and blended the flour and butter, until the mixture resembled small crumbs.
With the mixer still running, I slowly added the cold water, vinegar and dissolved salt mixture into the flour.  Then I watched and waited and maybe held my breath a little, feeling doubtful, yet hoping that this was going to work.  After what felt like minutes (but really were only seconds) , those old thoughts were starting to resurface, "maybe I just need to add a little more water...", when it happened!  In an instant it all came together into a ball and I had pastry dough. 
Amazing!  And so easy.
I gently kneaded the dough a couple of times and then divided it in half.
I shaped both pieces into a flattened disc and covered them with plastic wrap.  The recipe suggests refrigerating for at least an hour, or up to 3 days.  At this point it can also be frozen for up to 6 months.  If there was anything negative I had to say about this recipe it would be, you have to plan ahead.  Mixing up the dough in the morning and then putting the pie together in the afternoon, was the system that worked for me.
After the refrigeration period, I took the dough out and let it rest for about 15 minutes before rolling into a circle.  I can't even begin to describe what a dream this dough is to work with.  No crumbling or tearing.  It's perfect!
I decided to put this crust to good use by making a blackberry pie.  Thanks to my friend who has been sharing her blackberries, I had plenty to make Mark's favorite dessert.  

And just look at that beautiful pie! The crust was delicious, flaky and tender and buttery... oh my!  I'm completely sold.  This really is the perfect pie crust.  I've made it twice now, with good results both times.  Having some of this pastry dough tucked away in the freezer seems like a smart idea.  And with the holidays just around the corner, pies will definitely be on the menu.
Basic Pie Crust
1 cup (2 sticks) cold, unsalted butter
2 1/4 cups all purpose flour
2 t. apple cider vinegar
1/2 t. salt

Cut the butter into 1/2 inch squares and combine with the 
flour in the bowl of a stand mixer.  Using your hands, toss
the mixture to coat the butter in the flour.  Put the bowl in the
freezer.  In a measuring cup, combine 1/2 cup water, the
vinegar and salt.  Stir until the salt dissolves and put the 
measuring cup in the freezer.  Freeze both mixtures for 10
minutes.

Take the mixing bowl out of the freezer and blend the mixture
on low speed with the paddle attachment until it starts to 
become the texture of crumbly meal.  Take the measuring cup
out of the freezer and, with the mixer running on low speed,
slowly pour the wet mix into the bowl.  The dough will be
crumbly at first, then after 10 to 20 seconds, it will come
together in a ball.  Stop the mixer.

Turn the dough out onto the counter and press it together into
 a large disc.  Cut the dough in two equal parts, wrap each piece
in waxed paper or plastic wrap and press into a disc.  Refrigerate
for at least 1 hour or up to 3 days.  Take the dough out of the
refrigerator 15 minutes before you are ready to roll it out.
Makes two 9 inch pie crusts.
 From The Homemade Pantry by Alana Chernila

Wednesday, August 21, 2013

Plan B or How to Make Play Dough

What do you do when you've been planning all summer to get together and hike with some of your favorite little friends (because we love to hike and picnic and wade in the water), and every time it's planned, it rains... and your running out of time, because school starts next week, and you've promised them we would play together before school starts... and those sweet little faces look up at you in serious expectation on Sunday morning, while giving you a big hug (how's that for the best run on sentence you've seen in a while!)?  You say, " This is the week and we will definitely play, rain or shine!"  And then you begin developing plan B because the weather forecast calls for rain.  Surprise, surprise.

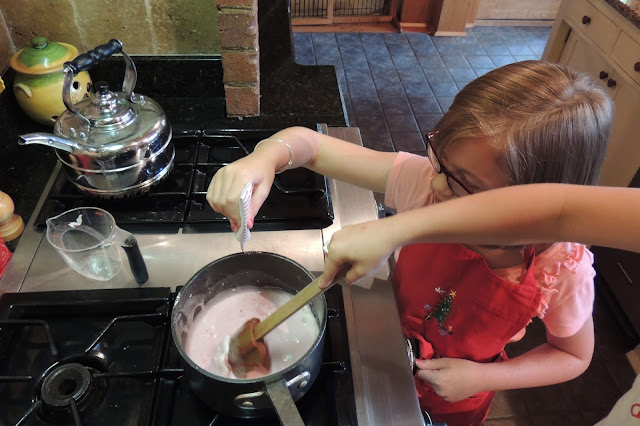
The rain however, did not stop us from having a great time.  We put on our aprons and began our day in the kitchen making play dough.  It's been a long time since I dug out this recipe card, but we found out, it still magically produces the best dough for creative play possible.  It's way better than the stuff you buy in the stores (although as a child I loved that smell of a freshly opened can of Play-doh, the smell of chemicals - weird huh? -that smell that takes me right back to my grandma's kitchen table). 

The girls loved this project, because they could do it themselves.   From measuring the flour, 
vegetable oil,
salt,
and cream of tartar,
to pouring in the water, it was all done by little hands.
The most exciting part was squeezing in the food coloring.
In less than five minutes, while constantly stirring,  the liquid became a solid and then the real fun began.
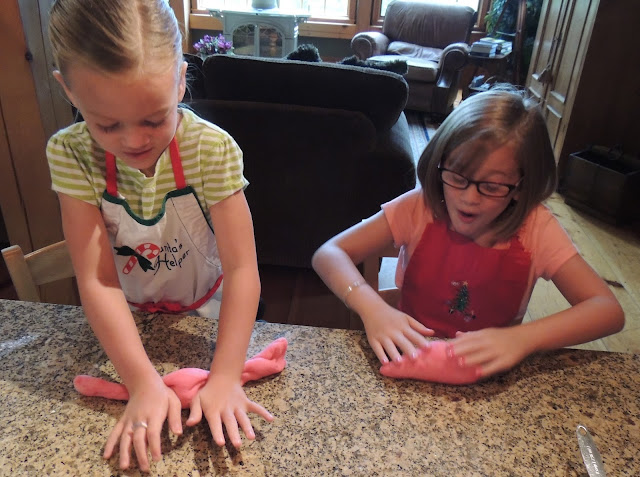
We learned what it means to "knead" and kept our hands moving quickly, because it's pretty warm when it comes out of the pot.  It sure feels great between your hands, though.
So, what colors should we make?  Everyone had a different favorite color, and some of us had more than one.  
And then we couldn't forget little brother, who would be playing with this when they took it home, so we had to make green for him. 
Oh, what the heck.  We decided we'd just make all of them.  Aren't they pretty?  I loved the way they lined them up ROYGBIV style.  Some things we learn in school, really do stick with us for a lifetime.
It was hard to decide where we should go for lunch, but after much  deliberation, we settled on "mexican".  It was all about the chips and cheese!
Next stop, was shopping at Claire's.  This store is heaven for little girls.  I loved watching them "ooh, and ahh" over everything!
Miraculously we made it out of that store, with just two bottles of fingernail polish and a long wish list.  Then we went home and painted our nails orange and watched a movie.
It turned out to be a pretty good day, even if we didn't get to go hiking.  Sometimes plan B can work out to be even better than you imagine.  I love these girls and the memories we make each time we hang out and play.  They help to keep me young!


Perfect Playdough
1 cup water
2 t. cream of tartar
1/2 cup salt
1 cup flour
1 T. vegetable oil
food coloring

Combine ingredients in saucepan and cook over medium heat,
stirring constantly until mixture becomes thick and pulls away
from the sides of the pan. This usually takes 2 - 3 minutes.
  Knead until smooth.  Keep in airtight container.


* Some moms don't like play dough in their house, so I had this activity approved before we started.  I was never one of those moms. 

Tuesday, August 20, 2013

Dressing Girls Around the World

I'm going to do a little bragging here.  I have a great mother-in-law.  I call her mom, and since my mama's death fifteen years ago, she has in many ways helped fill that void for me.  She's kind and gentle  and loves in a maternal way.  Around here, most people (and not just family) call her mom or grandma, and she wears those titles proudly.  She loves children, so it's really no surprise that she has spent the last year making 150 dresses for little girls all over the world.  But what an accomplishment!
The idea to make dresses came to her as she visited with a friend who had served a mission with Hope International Ministries. This friend told her about the children, living in poverty, who would line up to receive supplies and gifts.  The wheels started turning in her mind and she began searching for ideas on the internet.  When she came across "dressagirlaroundtheworld.com" she knew she had found what she had been looking for.  This site had patterns and directions for making the dresses and she took from them ideas and made her own designs.  Not overly impressed with the pillowcase dresses shown on the site, she wanted to make something that would be beautiful as well as functional.  She said, " I wanted to give to other little girls something that I would be happy for my own grandchildren to wear and I would think about that as I made each dress."
Once she got started, she just kept on sewing.  In August of last year, she set a goal to make 100 dresses by her next birthday.  As it turned out, she exceeded her goal.  On August 14th, of this year, she celebrated her 73rd  birthday and all of these little dresses are  now stacked  in her guest room, waiting to be delivered.
I think her design is so clever.  She starts with a girl's shirt, from 3 months to 12 years in size.  Then she finds matching fabric to add the skirt, making it into a dress.  She pays less than $2 for each shirt, often receiving donations, when people find out about her ministry.  She brings the shirts home and washes each one before making them into dresses.
I asked her where she found all the fabric for the skirts and she smiled when she told me, "everywhere".   She's used pillowcases and other bed linens, as well as curtains.  Some adult and teenage clothes have enough material, that they can be taken apart and used. This is recycling at its finest!
All three of these little dresses had the rose print skirts that came from "Barbie" curtains that she found discarded and unopened. She says, "Once you start making these dresses, you always have your eyes open for fabric that could be used to make the skirts."

This picture shows how she sewed the skirt onto the shirt.  What an easy sewing project, one that even I can do.  Just a few straight seams and it's finished.  Sometimes she adds embellishments, like this little pocket, onto the dress.  In fact, she says it often takes longer to come up with the design, than to actually sew the dress.  But matching shirts and fabric, adding a little pocket or buttons, that's the fun part!  It's surprising what you can do with a simple, plain t-shirt.  She has even taken baby Onesies and cut the bottoms off to make dresses for the smallest girls.  She admits the littlest dresses are her favorites.
When each dress is completed, she holds it up and gives it a hug.  "I want my love to go with that dress to the little girl who will wear it.  I want her to know that someone in the world loves her", she says.
There are so many things about this ministry that impress me.  But  one thing I keep thinking about, is how motivated she was to begin and complete this on her own.  After some serious health challenges in the past few years, she is feeling much better and wakes up every day thanking Heavenly Father for the gift of a new day.  She says, "I have been so blessed and I want to spend my time giving back."

I find it's easy to get caught up in a service project with a group of people, but to see a need and then act upon it, by yourself, is something all together different.  How  many times have you thought, "well there must be something I can do that will make a difference," and then quickly dismissed the idea, because it seemed too hard, too inconvenient, too big to do by yourself?   I know I have done this more than once.  Mom has reminded me that one person can do so much good, one little dress at a time.  Personal ministries, we all can have one (or more), and wouldn't the world be a better place if we did?  Maybe we won't be sewing 
dresses for little girls, like mom has done, but surely there is something we feel led to do that would make a difference.  I'm already beginning to think of some things that might work for me.  One thing I'm definitely going to be doing is shopping for shirts and fabric, at yard sales and thrift shops, because Mom has plans to make more dresses by her next birthday.  It wouldn't be fair for me to reveal her goal, but I will say it's lofty!  Thank you mom, for inspiring me, to seek out new ways to serve.  I once heard someone say, "a need seen, is an assignment given."  As disciples of Christ, our eyes should be open to the needs around us, and with prayerful questioning, I believe the assignments, as well as the means to accomplish them will be made evident in our lives.

Friday, August 16, 2013

Happy Birthday #1

I've had a lot of fun this year writing Birthday posts for my kids.  Today I'm going to wind that down where it all began.  The first shall be last.  Last, but not least.  Ok, enough of that.  I'm just having a hard time wrapping my head around the fact that I have an adult child (once a child, always a child to your mama) who is 29 years old today.  Travis, how can this possibly be?  When I look at this picture, I realize I was practically a child myself, when I had you. ( I figured it was only fair play for me to share in some of the embarrassing pictures.)  And you've survived, and even thrived, in spite of it.
Being the eldest child brings it challenges.   Parenting was new to us and we experimented on you, but love covers a multitude of mistakes and we were so in love with you!   There is nothing in a mother's life to compare to the first pregnancy, first birth, first bath (my mom had to come and help me), first Christmas (how many babies get to be baby Jesus?), first everything!  It's all new and exciting.
For twenty- two months, it was just you and me and I loved every minute of it.  Well, of course Dad was there sometimes, but most of the day it was just the two of us, with life revolving around naps, feeding schedules and outings.
Shortly after you were born, we moved to Vermont (much to the dismay of the grandparents) and started our New England adventure.  
Money was pretty tight back then, but we found plenty to do, as we took delight in discovering a new part of the country and introducing the world to you.  We hiked, we went camping, we played in the leaves.  Dad had the car and I had the stroller and on nice days we would walk through our little town (complete with covered bridge) and go to the park or to the Dime Store and maybe even buy a new toy or book.  I look back on those days with the fondest of memories.  It was an idyllic place and time.
I attribute your love for reading to the fact that we read books every day, multiple times a day.  There was plenty of time for reading, as this was before the days of computer programs and we could only get one fuzzy channel on our tv.  Now don't you feel old?  ( As you can see in this picture, baby brother would soon make an appearance and your only child days would be over.)
And then in the winter, there was snow.  Lots of snow.  You could barely walk in all that snow.  We sat you down on the top of the picnic table for this picture.
You were a fun, precocious little boy that made everyone around you smile.  With an early grasp of language skills, you could tell some amazing stories.
Being the eldest, your brothers were always trying to keep up with you. ( wonder why you were wearing Dillon's shirt...)
As a teenager, you experimented with the spiky hair and found outlets for your musical talents with the symphony, singing your heart out as lead in the senior play and in the basement bands.
I will never forget all those band practices in the basement....
Although you weren't a difficult teenager,  this was all new for me too.  Riding this roller coaster was one I wasn't prepared for and once again you were our guinea pig.  All I can say is, sorry for the hard days.  I felt like those years would never end, maybe you did too, but they did and we both survived them!  And now...
look at you!  Your a man (who in some of these pictures, looks very much like your dad did at this age), finding your own way and making a life for yourself.  You're in that season of hard work, of establishing relationships and a career.  It takes so much time and effort to figure it all out.  But with your talent, intelligence and work ethic, you're doing a fine job and we know you'll find success in whatever brings you fulfillment and joy.  With your current interest in food and dining, I've enjoyed having someone to introduce me to fun restaurants and talk the foodie lingo.  Mothers never stop learning from their children, in fact, sometimes I think I'm learning more from you than you ever did from me.  And even though we don't see you as much as we'd like, when we do get to spend time together, it's precious time.  
Happy, Happy Birthday Travis!  Heavenly Father sure blessed our family when He sent you to us. You are one special son and we love you bunches!